
I have spent the bulk of the past two weeks working on two personal side projects – built in Elements, of course. As is usually the case, this gave me ample opportunity to identify areas for improvement and add features to make Elements even more useful for everyone.
As such, builds .3023 and .3025 bring a vast amount of tweaks for macOS and (especially) development. In addition to many smaller quality-of-life fixes i'll list below, there's one major new feature: direct publishing to App Store Connect right from the build.
What happened is that after a few days of working on my projects, Apple's Transporter app, which is used for uploading apps to be published on the App Store, stopped working for me. When i say "stopped working", i mean it became literally unusable. Every time I start it, it crashes immediately, within a few seconds. From the crash log (reported to Apple, of course), it looks like maybe the app couldn't handle that I now had an iOS 26 style icon in the last version of my app that I submitted (successfully) with it.
A solution was needed, and there is a command-line tool that can be used to submit apps as well, so I figured it was time to just integrate this into EBuild!
Below, I will describe the whole process you need for submitting apps, both to the iOS and the macOS app store (the processes differ slightly). Some of the steps are not new, but the final actual submission set is.
Submitting apps to the App Store with Fire and EBuild
The first thing you want to do to prepare your project for app store submission is to designate one Project Configuration for it. You can either just use the "Release" config (I did that for my iOS app), or you could create a dedicated "AppStore" config (which I did for my macOS app – mainly because I also want to build that app for Developer ID – i.e., distribution outside of the Mac App Store).

You'll set up all App Store-specific settings for this configuration only – this way, you can keep using the Debug config for local testing.
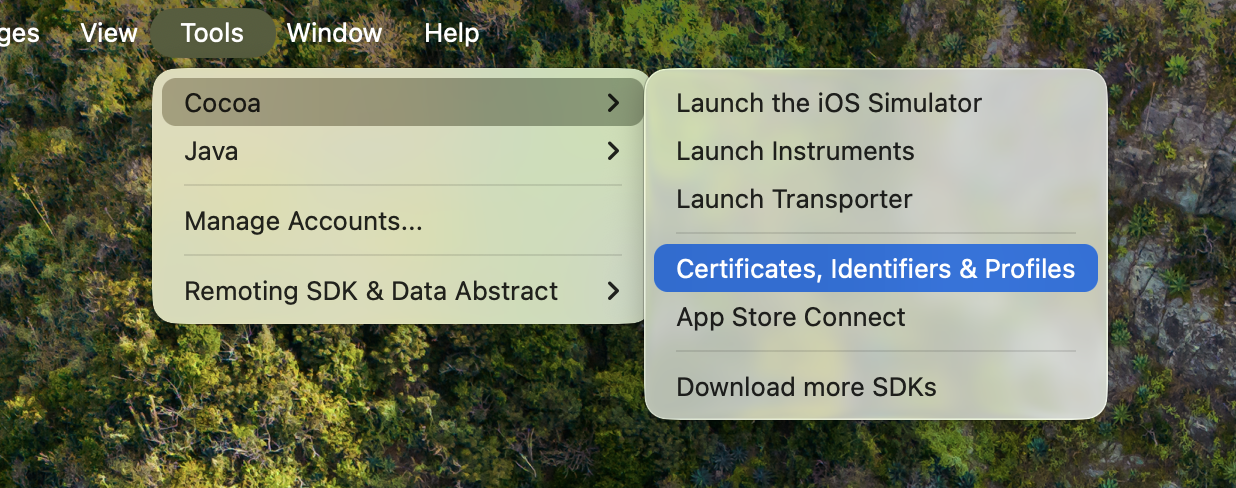
The first thing you'll need to do is go to "Certificates, Identifiers & Profiles" on Apple's developer website and set up a few things. That page is handyly available right from the "Tools" menu in Fire:
You will need to create three (and a half) things:
- Create an identifier for your app. This is a reverse-dotted-domain style name that will uniquely identify in your app within the App Store. You will usually include your reverse company domain, e.g."
com.evilcorp.mycoolapp".
As part of setting up this identifier, you will also select any special capabilities that you want your app to use that need Apple permission – e.g. using MapKit, getting Push Notifications, access to HealthKit, or whatnot. - With that done, you will create one or two certificates that are used to sign your app. You will need an "Apple Distribution" certificate; that one will work for iOS and macOS, and you can use the same certificate for all your apps. For Mac apps only, you will also need an additional "Mac Installer Distribution" certificate.
Follow the steps on the website to create and download these certificates. This includes creating a Certificate Request in the Keychain app, uploading it, and then downloading the result. Double-click the downloaded file(s) to install the certificates in your keychain. - Finally, you need to create a provisioning profile for your app. You need to pick either an "App Store Connect" (for iOS, tvOS, visionOS, etc) or "Mac App Store Connect" (macOS, duh) from the "Distribution" subsection.
As part of creating the profile, you will select both the identifier and the certificate you created before, as well as a unique name. I find that I often need to update and re-download profiles for my apps, so I suggest giving detailed names to these. The pattern I use is "App Name (Month Year [optional letter])", e.g. "Verbs (September 2025)". That way, if I download new ones, I always know which one's the latest one.
After downloading the profiles, you can simply double-click the iOS ones to have Xcode install them in the right place for you. I found this does not work for macOS profiles (Settings.app wants to install those), so instead, you need to manually copy those to~/Library/Developer/Xcode/UserData/Provisioning Profiles.
With these three things out of the way, you can now set up your app project.
- First, make sure the "Bundle Identifier" setting in the "Packaging" section matches the identifier you picked above. You can set this on the project level (recommended), or specific for your App Store configuration (if you want to use a different identifier for local development)
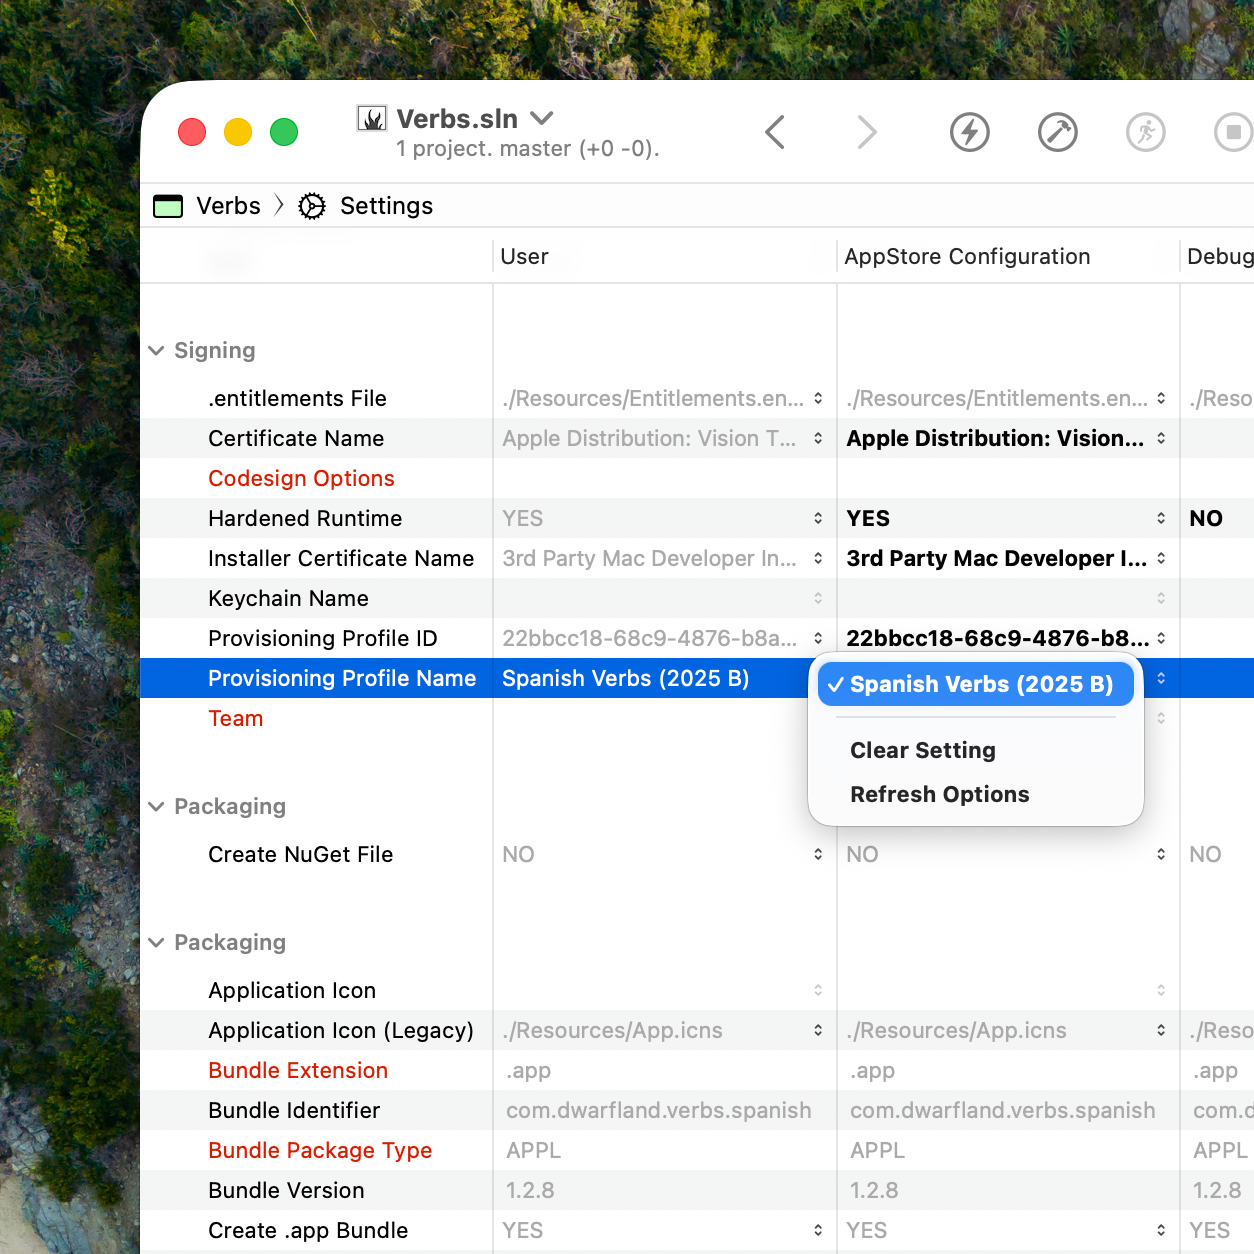
- Next, navigate to the "Signing" section in Settings, and select your newly downloaded profile under "Provisioning Profile Name" and the Apple Distribution certificate under the "Certificate Name" setting.
- For macOS apps, you also need to pick a value for the "Installer Certificate Name" setting; select the second certificate you created; it will be called something like "3rd Party Mac Developer Installer: Company Name (TEAMID)".
If you don't see your new values yet, select "Refresh Options" from the pop-up. Make sure you pick the right items; especially for certificates, you may see many similar options to choose from – your certificate should be named "Apple Distribution: Company Name (TEAMID)", where your company name (or personal name) matches how you registered with Apple, and the Team ID is a ten-digit number/letter combo.
Make sure the certificates you selected are named "Distribution", and not "Development"!
Do note: the exact naming conventions of these certificates have changed over time, and may change again; the naming I am using here is based on certificates I generated just now, in September 2025.
Next, let's move to the "Packaging" section.
Since this only applies to building apps, your project will already have "Create .app Bundle" set to YES. Let's enable packaging that bundle for distribution, which is easy:
For iOS (and tvOS, visionOS, etc), enable the "Create .ipa File" setting. .ipa files are essentially .zip files that contain your .app bundle, as well as additional metadata. Elements creates them for you.
For macOS, enable the "Create .pkg File" setting instead. Mac apps get packaged as an installer package, for legacy reasons. But no worries, this is also handled for you.
If you do a build for your App Store configuration now, you should receive, as final output, a .ipa or .pkg file with your app name, its current version number appended. This file is ready for submission to Apple.
Distribute This!
Finally, let's set things up to upload your file to App Store Connect automatically for you. There are four settings available for this.
- First, you need to set the "App Store Connect Username" and "App Store Connect Password" settings. Username is your Apple ID, and for the password, you need to create an "app-specific password" at account.apple.com.
I recommend setting the password in the "User" column of the settings, which makes it stored in your local.elements.userfile, which you usually would not commit to, e.g., Git, or share with others
Ostensibly there is a way to store the password in Keychain instead, and EBuild will try to get it from there, if you leave the password empty – but in my testting, I have been unsuccessful in making this actually happen according to how Apple document it should work. 🤷♀️
- Lastly, there are two options you can choose for what to do on App Store Connect. You can set the "Validate w/ App Store Connect" setting to
YES, and Elements will upload your final app to Apple for verification, but not submit it yet. If you set "Publish to App Store Connect" toYES, your app will be uploaded and submitted. Assuming that is successful, you will see the new build show up on the App Store Connect website within a few seconds, and within a minute or so (usually), you can take next steps – such as sending it to your testers on TestFlight, or submitting it for actual review to the store.
The "Validate w/ App Store Connect"-only option is a great first step if you just want to see if everything is configured correctly, as it will show you warnings (or errors) if anything is off, e.g. if you have a wrong profile or certificate selected, of if there's any other techncial problem that would prevent the binary from being submitted.
It is important to know that you can only (successfully) publish a build to App Store Connect with any given version number, once. After publishing has succeeded, you will have to increase the "Bundle Version" setting to a higher semantic versioning value before you can publish another build. For this reason, I would generally recommend only turning the "Publish to App Store Connect" option on after you have validated, and once you're sure that this is the build you want to publish. You can leave "Validate w/ App Store Connect" on all the time; "Publish" overrides it.
Of course, once everything is set up smoothly and you're in the groove of submitting new builds regularly without a hitch, you can just leave "Publish to App Store Connect" on for good. Work/test in your Debug profile, and when you're ready to ship a new build, just update the Bundle Version, switch to the App Store config, and press ⌘B – done. Then switch back to Debug to keep working.
Other Toolchain Fixes and Improvements
More things were fixed for Cocoa development this week
- The default location for provisioning profiles moved (and Xcode now clears out the old one, sometimes). EBuild now finds profiles in both places correctly.
- The internal tool for creating
.pkgfiles moved with Xcode 26 - The toolchain was improved for handling new "os 26" icon files – both for macOS and iOS. The "Application Icon" setting is now available for iOS as well, and uses the new
.iconformat. For macOS, you can still specify a legacy.icnsfor pre-Tahoe, using "Application Icon (Legacy)" setting. - When running in the iOS Simulator, console output was not available in the Fire debug console, which made debugging very annoying. This now works as expected (but only for
NSLog()and RTL2'sLogfunction; there unfortunately is no way to get full StdOut (e.g.writeLn()) from the Simulator. I recommend usingLogcross-platform everywhere. Also, check out thelogandlogceditor code snippets!) - Third-party Frameworks nested in an iOS app were incorrectly re-signed with the app's bundle identifier, instead of their own. This was never an issue before, but it is now, so that was fixed.
- You can now explicitly mark framework references as "weak" in the IDE. This is helpful (dare say needed) for supporting older deployment targets. For example, iOS 26 pulls in a new
UIUtilitiesframework if you useUIKit. You need to mark that as weak, or your apps will crash on start, on iOS 18 and below.

- There have been improvements to the iOS debug engine for evaluating locals, class members, and structs.
- There's a new "Always Build for Device" option that you can set for your Release/AppStore config. That way, you can keep, e.g., your favorite Simulator selected in the IDE, but when you switch configs to build for publication, it will build for a device, without the need to also change the target device.
Get Elements build.3025 now, out on the Stable channel for all active customers, and as a free thirty-day trial!
